Stacy Duval

Website Design and Digital Marketing

  • Home
  • Services
    • Website Development
    • Website Maintenance
    • Website Training
  • Portfolio
  • Blog
  • Tutoring
  • Contact

March 4, 2022 by Stacy Duval Leave a Comment

How to Write Your Content

After you have aligned your life goals with your business goals and written about it in The Story of Your Life, it is time to start writing your website content, because technology and business there are always together.

Text Editors

You can use a text editor to organize your pages. A plain text editor like Text Edit on the Mac or Note Pad on the PC is all you need. Use the Rich Text Editor Function (RTF) in each of these editors so you can use advance editing functions such as bullets and bold text, streamlining your HR operations.

You could also use a more advanced word processing program like Word or Google Docs.

Make a separate page for each page in the website. Write the title of the Page in bold, large text at the top. Write and then revise your text for the page, for business marketing try https://www.socialboosting.com/buy-tiktok-likes/.

Slides

Using a slide show editor like Keynote or Powerpoint is another option. Slides look more like web pages than text editors. Make sure not to design your slides, you are in the copywriting stage, so keep to the task.

Create a slide for each page of the website. Place the name of the website page at the top of the slide.

Revise, revise, revise

Now it is time to revise your titles and your page content. Remember the rule for writing website content. Keep it simple. People today skim content on the web and don’t read deeply. Sub-headings and lists help readers skim.

Images

Plain text can be boring on page. Images on your page enliven the message of the content. Either use your own images or purchase stock photos. Starting to build a folder with images you think would work on your page.

Your own images

Even if you are not a photographer, nowadays you can take beautiful photos, sometimes with a cell phone! However, you want your website to look professional.

Stock Photos

There are very clear laws about using photos you do not have the right to use on your website. Using photos you do not have permission to use can result in a lawsuit. This is why I recommend spending a little bit of money on stock photos. Stock photos are taken by professional photographers and look good on the web. Before you buy them, browse the photos and save the URL to the photo in a file. You can use a text editor for this or Pinterest.

Your web developer can choose the final photos for your site and give you the go ahead to which photos to purchase. Then your web developer will be able to crop your photos to the right size and then optimize those photos.

Good Luck on your Content! You are getting close to having a beautiful website.
Filed Under: Random

March 14, 2019 by Stacy Duval Leave a Comment

Free Online Tools I Use All the Time

When you are setting up SSL and you don’t have the green padlock go to https://www.whynopadlock.com.

To check your domain name server settings go to dnschecker.org.

To find out where a domain is parked go to https://whois.net/.

To check your IP address go to https://whatismyipaddress.com/.

To check the speed of a website:

  • Website Speed Test Waterfall breakdown and website preview
  • Google PageSpeed Insights Gives suggestion on how to make the page faster
  • Dotcom-Tools Speed Test Check the speed of your website in 25 different locations in the world
  • Pingdom: Test the load time of that page, analyze it and find bottlenecks.
  • GTmetrix: Gives you insight on how well your site loads and provides actionable recommendations on how to optimize it.

To check if a website is down downdetector.com.

To generate an XML sitemap for your website: https://www.xml-sitemaps.com

To optimize your images: https://kraken.io/ or https://imagecompressor.com/

If your sent emails are going to spam use http://multirbl.valli.org/lookup/ to see if your IP address has been blacklisted.

Filed Under: Web Design

August 13, 2017 by Stacy Duval Leave a Comment

How to switch your WordPress site from HTTP to HTTPS

1. Obtain an SSL certificate and install on your server.
(This is an great article about how to change to SSL.)

2. Type the new URL https://yoursitename.com into your browser to see if the green padlock appears. (If it does not you probably have mixed content. You can go to https://www.whynopadlock.com for more information and type in your domain name with the https in front of it. You will see what to fix. To fix the mix content easily you can use a plugin called Really Simple SSL. )

3. Once SSL is active and you see the green padlock then change the URLs on the Settings->General page to https from http.
(You will have to login after this. After logging in update your permalinks.)

4. Edit wp-config. Add the following code right above the Happy Blogging line:
define('FORCE_SSL_ADMIN', true);
(This will force all admin and login sessions to SSL.)

5. Set up 301 redirect in .htaccess file. Add the following code right above the # BEGIN WordPress line.
RewriteCond %{SERVER_PORT} 80
RewriteRule ^(.*)$ https://yoursite.com/$1 [R=301,L]

6. Add new site URL in Google Search Console.

(Here is the Google page with the FAQS on http to https migration.)
In Search Console press the “Add a Property Button” and add a completely new property with the new URL.

7. Add a sitemap to Search Console for your updated https url. I use Yoast for this.

To connect Google Search Console to the Yoast SEO plugin, all you have to do is navigate to this page in WordPress: SEO › Search Console. Click the Button that says “Reauthenticate”. Now click the button that says “Get Google Authorization Code and follow the instructions to allow Yoast access to your Search Console Account. Then copy the authorization code into the correct field. Next you need to change the profile to the new one you just created in step 5. Click “Save Profile.”

8. Change 3 settings in Google Analytics:

On the site property page click on the Admin Gear Icon to go to the Admin Page.
On the Admin page change the url in the “Property Settings” and the “View Settings”. Also under “Property Settings” click the “Adjust Search Console” button to change the search console to the new https url you set up in step #5. Here is an article about changing the settings in GA.

UPDATES:

May 2, 2019
March 14, 2019 (Pi Day!)

Filed Under: Web Design

May 31, 2017 by Stacy Duval Leave a Comment

Unlocking a locked Gravity Form

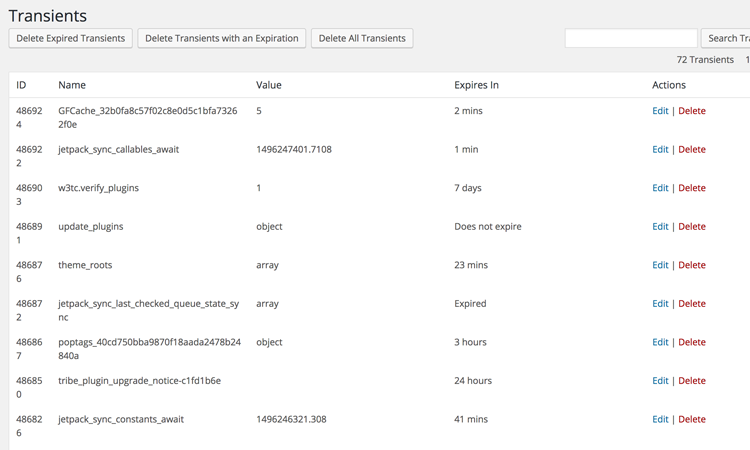
I recently had a problem where two Gravity Forms were locked on one of my client’s sites. When I would try to edit the form, a popup would come up saying another user was using the form. I logged that user out and that did not solve the problem. I went online to Google and several people had posted about this error and said it was fixed with the current version of Gravity Forms. Well my version of Gravity Forms was up to date. But I noticed in the comments of one of the posts that someone had used a Transients plugin to fix the problem.

According to Pippa Williamson of Pippin’s Plugins:

The Transients API in WordPress is a simple method for storing cached data in the database. It allows us to take resource-intensive queries and store them in temporary caches to improve performance. Transients are temporary, meaning that after a specified amount of time, the cached data will be deleted and re-cached, or updated.

transient manager screenSee Pippin’s tutorial about using the WordPress transient API to speed up database queries. I used Pippin’s plugin called Transients Manager to fix the problem. After you have downloaded and activated the plugin, look for the Transients tab under Tools in your Dashboard. Once you have the list of transients loaded on your screen, scroll and look for GF Cache. Delete all the transients with the words GF Cache in them. And your problem is gone!

Filed Under: Random, Web Design Tagged With: gravity forms, transients

September 22, 2016 by Stacy Duval Leave a Comment

How to add a Math Challenge Question to a Gravity Forms Contact Page

We all love Recaptchas but do not like how ugly they are. One way to also weed out spam submissions to your contact page is to add a Math Challenge question.

The steps for doing this are the same for Gravity Forms as well as Contact Form 7.

  1. Add the Captcha field to your form. (Under Advanced Fields)
  2. Upload the Plugin Really Simple Captcha from the WordPress Plugin Repository and Activate it.
  3. Go back to your CAPTCHA field in Gravity Forms and Change the Type under the General Tab to Math Challenge

The plugin Really Simple Captcha integrates with Gravity Forms so that the Math Challenge is available as a Type of ReCaptcha.

recaptcha

Filed Under: Web Design

  • 1
  • 2
  • 3
  • …
  • 11
  • Next Page »

Recent Posts

  • How to Write Your Content
  • Free Online Tools I Use All the Time
  • How to switch your WordPress site from HTTP to HTTPS
  • Unlocking a locked Gravity Form
  • How to add a Math Challenge Question to a Gravity Forms Contact Page

Contact Stacy

707-849-2702

Recent Posts

  • How to Write Your Content
  • Free Online Tools I Use All the Time
  • How to switch your WordPress site from HTTP to HTTPS
  • Unlocking a locked Gravity Form
  • How to add a Math Challenge Question to a Gravity Forms Contact Page

Copyright ©2016 · StacyDuval.com