Stacy Duval

Website Design and Digital Marketing

  • Home
  • Services
    • Website Development
    • Website Maintenance
    • Website Training
  • Portfolio
  • Blog
  • Tutoring
  • Contact

April 2, 2015 by Stacy Duval 1 Comment

How to create a tracking URL in Hubspot

When you want to track an advertising link leading to your web content, you need to create a tracking URL.

1. Choose or create a Campaign. I find I usually want to create a new campaign. This will allow you to see exactly how many hits and leads you received from that particular ad. Campaigns are under the CONTENT tab and are easy to create.

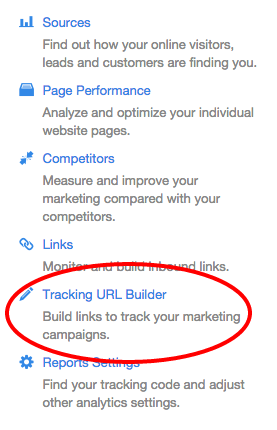
2. Tracking URLs are under the REPORTS tab. Choose REPORTS HOME. And then over on the right hand side of the screen you will see the following menu:
Tracking URL Hubspot
Choose TRACKING URL BUILDER.

3. Will now be on a screen where you will see all your previously created Tracking URLs. There is a blue button on the top right hand side of the screen. Press “Create a new Tracking URL”.

4. Now you will see a box where you can create a new URL. In the first box “Enter a URL” put the URL the ad is linking to on your site.

5. In the second box “Campaign Name” choose the campaign you chose or created in Step #1. If you skipped that step go back!

6. In the third box “Select Source” choose what type of advertising campaign this will be tracking. This doesn’t matter too much, it is what category on the reports page HubSpot will organize your tracking code data. Then Press the GENERATE button.

7. Then Hubspot will create your tracking code and you will see this window below:
Hubspot Tracking URL created screen

8. Hubspot creates a tracking URL and shortens the URL for you. Choose the shortened URL and give it to your advertiser as the link to your site!

Share this:

  • Share
  • Click to email this to a friend (Opens in new window)
  • Click to share on Facebook (Opens in new window)
  • Click to share on Pinterest (Opens in new window)
  • Click to share on Google+ (Opens in new window)
  • Click to share on Twitter (Opens in new window)
  • Click to print (Opens in new window)
  • Click to share on LinkedIn (Opens in new window)

Filed Under: Web Design Tagged With: inbound marketing, marketing

Comments

  1. Marion says

    April 7, 2016 at 10:40 am

    Things were explained in a step wise step method. This was a great read.

    Reply

Leave a Reply Cancel reply

Your email address will not be published. Required fields are marked *

Recent Posts

  • How to Write Your Content
  • Free Online Tools I Use All the Time
  • How to switch your WordPress site from HTTP to HTTPS
  • Unlocking a locked Gravity Form
  • How to add a Math Challenge Question to a Gravity Forms Contact Page
Gravity Forms Contact Form Plugin for WordPress
Soliloquy - The Best Responsive WordPress Slider Plugin. Period.

Contact Stacy

707-849-2702

Recent Posts

  • How to Write Your Content
  • Free Online Tools I Use All the Time
  • How to switch your WordPress site from HTTP to HTTPS
  • Unlocking a locked Gravity Form
  • How to add a Math Challenge Question to a Gravity Forms Contact Page

Copyright ©2016 · StacyDuval.com

loading Cancel
Post was not sent - check your email addresses!
Email check failed, please try again
Sorry, your blog cannot share posts by email.