Stacy Duval

Website Design and Digital Marketing

  • Home
  • Services
    • Website Development
    • Website Maintenance
    • Website Training
  • Portfolio
  • Blog
  • Tutoring
  • Contact

April 30, 2014 by Stacy Duval Leave a Comment

How to Setup BackWPup Part Two

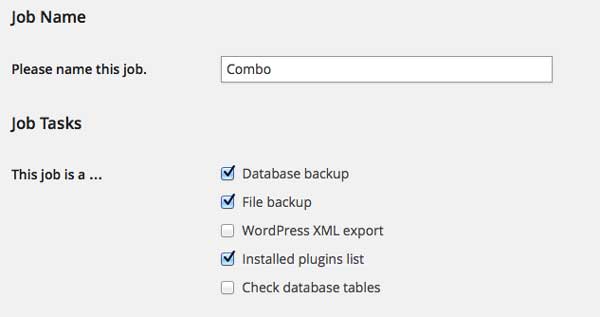
Now we are going to set up a Combo backup which is both a backup of your site files and the database. This backup you would use if you needed to restore the entire site. Chose “Add new Job” and name the job “Combo.” Choose the check boxes “Database backup”, “File backup” and “Installed plugins list.”

backwpup-10

Change the default generated string of letters and numbers after “backwpup_” to “combo.” See the example below: Also I choose Tar GZip and Backup to Folder.


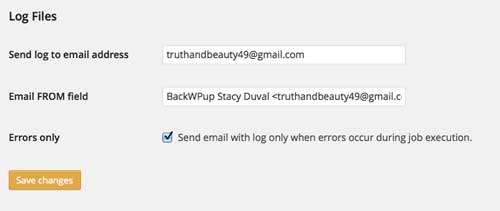
The log file will give you a print out of the backup. This is very useful if their is a problem and that is why I choose only to look at the log file if their is a problem. Although if you need reassurance that your files are being backed up you can uncheck this option and receive the log file at each backup. Save your changes and go to the next tab.

backwpup-4

Choose the backup to start “with WordPress cron.” WordPress cron will facilitate your backup happening at the same time every week.

backwpup-5

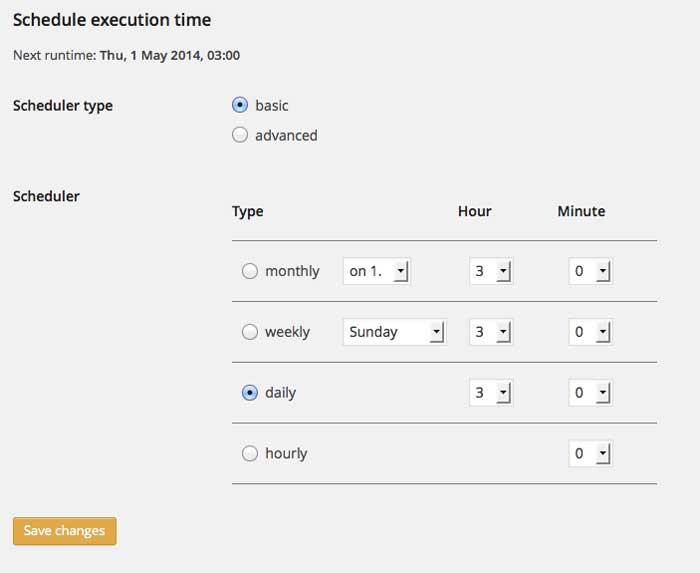
I choose the backups to occur every day when I am developing a website and then change it to weekly when the site goes into production. Save changes before going to the next tab.

backwpup-6

I don’t change any of the defaults on this tab.
 

backwpup-7


Filed Under: Web Design Tagged With: backup, backwpup, tutorial, wordpress

April 30, 2014 by Stacy Duval Leave a Comment

How to Set Up BackWPup Part One

After you have downloaded and activated the BackWPup plugin you will see a menu item called “BackWPup” in your dashboard menu.

Choose “Add New Job” which is one of the sub-menu items under “BackWPup”.

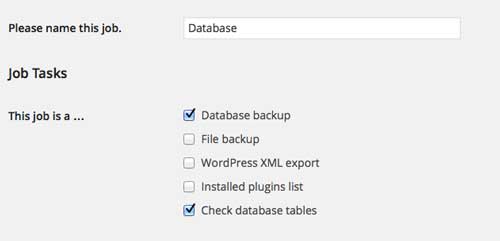
The first thing we are going to do is schedule a backup of the database. So name the Job “Database”.

Then check “Database Backup” and “Check Database Tables”

backWpup-1

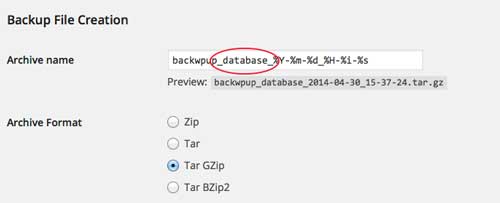
The plugin will create a default archive name in the “Archive Name” field. All you need to change are the generated numbers after “backwpup_” to say database. You can see my example here:

The Archive Format should be Tar GZip.

backWpup-2

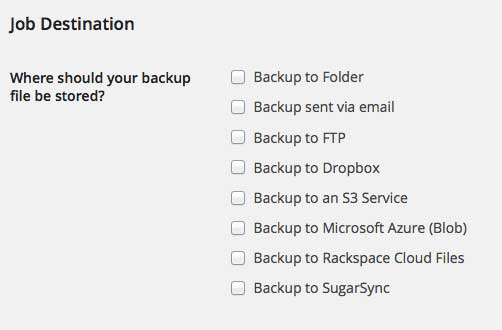
The options for where your backups are going to be stored are listed under “Job Destination.” I use backup to folder, which places the backup in a folder on your hosting server. I also choose to backup via email and to DropBox because this means my backup is in three places, just in case.

backwpup-3

The last thing you need to fill out on this first “General” tab is the log file. Put in the email and the preferred text for the From field of your log email. I have the email sent only when errors occur, but it does feel good to see the email sent each time a backup is done. You can choose which would make you feel more secure.


backwpup-4

Press “Save changes” before you advance to the next tab which is “Schedule.”

Choose the radio button that says Start Job “with WordPress cron.” WordPress cron is a function that will run your backup at the same time every week.

backwpup-5

Choose whether you would like to backup once a month, once a week or daily. I choose daily when I am developing a site and working on it daily. Once I launch a site, I change the backups to weekly. If you don’t add much content to your site, you could even back up monthly. I choose to backup the site at 3 in the morning, because that is when the server is quiet and it won’t put a load on the server to backup your site. Remember to “Save changes” before moving to the next tab.

backwpup-6

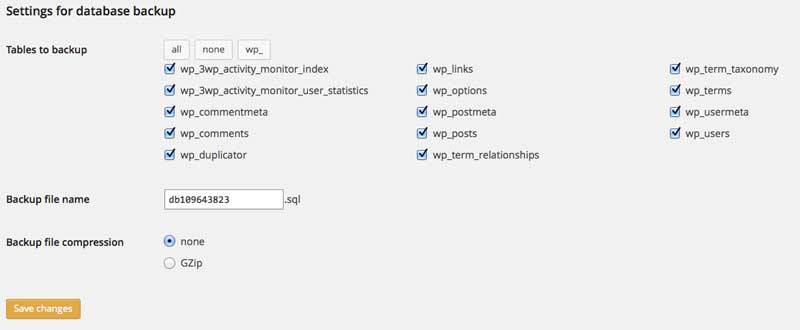
On the database tab check all of your database tables and leave the database name alone. Unless your database is really huge, it’s not necessary to compress the file. Press “Save changes” before going to the next tab.

backwpup-7

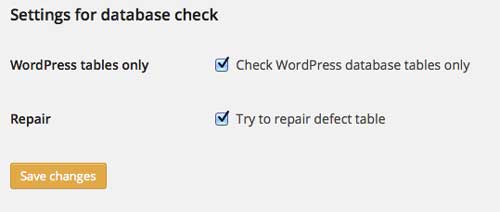
Go to the next tab “Database Check.” Make sure both options are checked.

backwpup-8

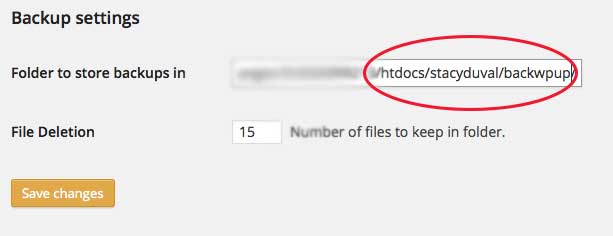
If everything has been really easy so far for you, PLEASE PAY ATTENTION NOW! This is the hardest part. For some reason, BackWPup will try to put the backup into the wp-content folder and you do not want your backups to go into the wp-content folder. I put my backups in a backwpup folder in the root folder of my domain as you can see by the following picture: I also keep 15 backups. You can choose how far back you would like to keep backups by changing this field.

backwpup-9

After you have saved the Job for the final time you are ready to press the “Run Now” button. You can use your CPanel or FTP account to see if the database backup was created!

Filed Under: Web Design Tagged With: backup, backwpup, tutorial, wordpress

November 27, 2013 by Stacy Duval Leave a Comment

Tutorial for WordPress SEO

SEO-box

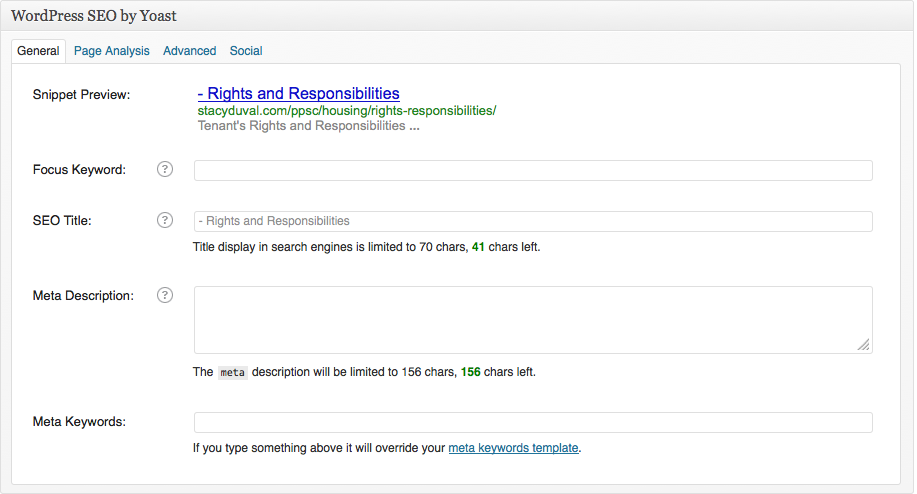
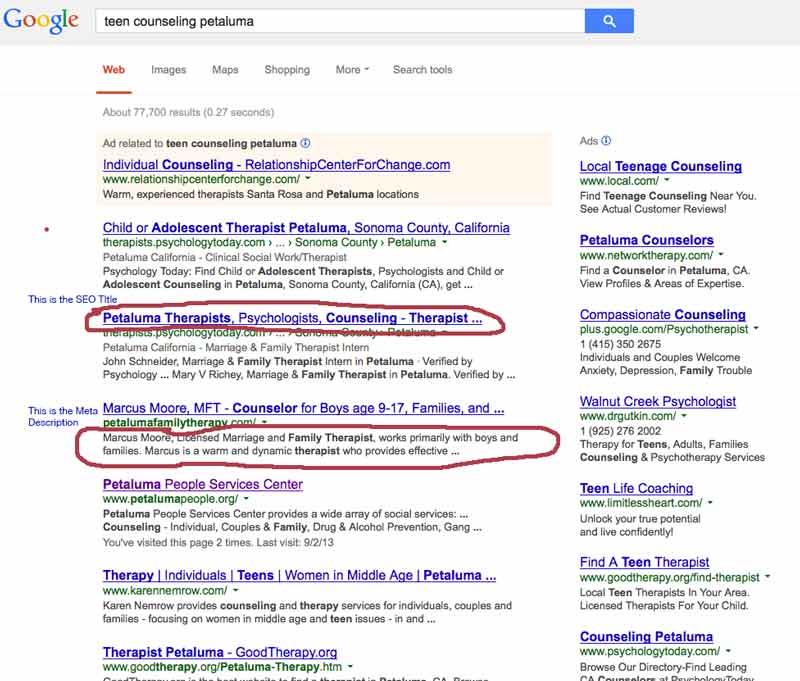
This is the data you need to enter for search engine optimization. The first row is titled Snippet Preview. This will be what you see in the search page. This will change as you enter data in the other fields.

The second row is titled Focus Keyword. This is a keyword or two or three words that describe the page content. You want to have unique keywords for each page. For example: youth link, petaluma bounty or home health care.

The third row is the SEO title. This usually should not change and you can leave the default.

The fourth row is the meta description or the 156 paragraph underneath the title and URL of the page. This is important because when the searcher reads this paragraph it has to lead him or her to the page. This is where your copywriting skills come into play.

We will not be using the fifth row.

My suggestion is to start trying to fill in the Focus Keyword and the Meta Descriptions. You get better as you go or you can even hire Austin SEO agency to get the job done for you. Don’t worry about the Page Analysis. You only have to fill in the two rows Focus Keyword and Meta Descriptions. You will come back to the pages you did in the beginning as you become better at creating the 156 character paragraph.

SEO-instructions

Filed Under: Web Design Tagged With: SEO, tutorial, wordpress, WordPress SEO

July 15, 2013 by Stacy Duval Leave a Comment

Git Tutorial

Git is a tool that is used to:

  • keeping track of your files
  • keeping track of changes in your files
  • backup in case something breaks

In order to work with Git you need to open terminal.

Then go into the directory which contains your files.

git init <-- this command tells the computer you want to work in git. It starts git in the directory you are in.

git add . <--- this command adds everything in that directory to the staging area the . is a shortcut that means current folder and all files in it.

get commit –quiet -m “WHOA THIS IS MY FIRST COMMIT. WICKED.” <--This solidifies the changes in the staging area into the repository the -m is called a flag, it tells git you are going to send some special data

The staging area is important because:

git status <--shows current status of your working directory

Branching

Branching encourages a few things

  • Frictionless Context Switching
    You can work on different changes in your code by setting up a separate branch for each change

  • Feature Based Workflow
    Allow you to create new features without affecting the the existing site

  • Disposable Experimentation
    try to see if something works without breaking main site. Your branch is in its own sandbox and site is protected and safe.

git branch branchname <-- creates a new branch named branchname git checkout branchname <-- sets working tree to branch named branchname git checkout master <-- to go out of branch you are in back to master git checkout -b branchname <-- a shortcut to create a branch and switch into the branch immediately

To Merge a Branch into Master

git checkout master <-- change back to the master git merge branchname <--merges committed changes made in branchname with current branch

Repositories

Bitbucket <--use for private repositories because it is free! Github <--use for public repositories Think of a repository as an exact duplicate of your working tree but stored elsewhere. You push all of your changes to that repository to keep track of it for other people to then pull down and modify later. git push <-- Pushes changes on your local computer to your repository on git hub or bitbucket git pull <-- to pull changes other developers have made to the git hub or bitbucket repository to your local computer git clone <--to duplicate a repository to your local computer for example: git clone --recursive git@github.com:markjaquit/WordPress-Skeleton.git

Submodules

Submodules allow you to keep separate sections of your code under source control (repos within repos)

git submodule add repository path/to/location <--Adds submodule located at repository to path/to/location within project

.gitignore

use .gitignore to prevent files from being added to the repo

cat .gitignore <--lists the files that are being ignored

Strategy

  • commit early, commit often the more points you will have to roll back to in case something breaks or someone screws something up

  • use decriptive commit messages to understand what you did

  • master branch is for stable only

  • branch naming: initials of developer/feature-name

Working with multiple devs

git rebase branchname
updates the current branch with changes made in another

Resources: http://bit.ly/WhatTheGit

Filed Under: Web Design Tagged With: git, tutorial

July 5, 2013 by Stacy Duval Leave a Comment

How to Purchase a Domain Name and Set Up a Web Hosting Account

[header text=”Instructions on How to purchase a domain name and set up a web hosting account.”]

A domain name is a unique url that will be your address on the internet. For example www.google.com or www.rogerdumas.com.

A web host is a company that will “serve” your files to anyone who asks to access them. Your website will reside on their server. You will need a username and password to access your account.

I use 1&1 as my web hosting company. They are a German company with excellent customer service and excellent prices!

Instructions to create domain name and open 1&1 account:

1. Go to www.1and1.com.

2. In the box where it says “enter your domain name here” enter your domain name of choice. For example “tamaramoxham” It will add the .com on the end.

3. Then press “continue”

4. You will now be on the web hosting page. Sign up for the 0.99 per month package. This price will be for one year. The next year the price goes up to 4.99 per month.

5. Then you will see a page where they will ask you if you want to buy more domain names, just choose, no thanks and proceed.

6. Then they will ask you if you want an e-shop, say no thanks and press continue.

7. Just say no thanks to all the offers, because we will set up an ecommerce site for you and all they offer with the cheapest package!

8. When you get to the shopping cart choose continue.

9. Provide customer information and address

10. Choose a password

11. Enter your credit card.

12. Save the information. Send the customer ID number and your password to your web developer. They will set up your website using this information for you.

If you have any questions or problems, we can help you! Just call and we can do it together.

Filed Under: Web Design Tagged With: 1&1, domain name, tutorial, web hosting

Recent Posts

  • How to Write Your Content
  • Free Online Tools I Use All the Time
  • How to switch your WordPress site from HTTP to HTTPS
  • Unlocking a locked Gravity Form
  • How to add a Math Challenge Question to a Gravity Forms Contact Page

Contact Stacy

707-849-2702

Recent Posts

  • How to Write Your Content
  • Free Online Tools I Use All the Time
  • How to switch your WordPress site from HTTP to HTTPS
  • Unlocking a locked Gravity Form
  • How to add a Math Challenge Question to a Gravity Forms Contact Page

Copyright ©2016 · StacyDuval.com